Since our last post about reorganizing and folding did so well and we got so many great questions, we wanted to do a part two to that video to help further improve your folding, hanging and clothing organization situation. Try some of these, or all of these, to get your drawers and closets in the best possible shape.
Don’t forget to check out Maker’s Clean Products for all your cleaning needs!
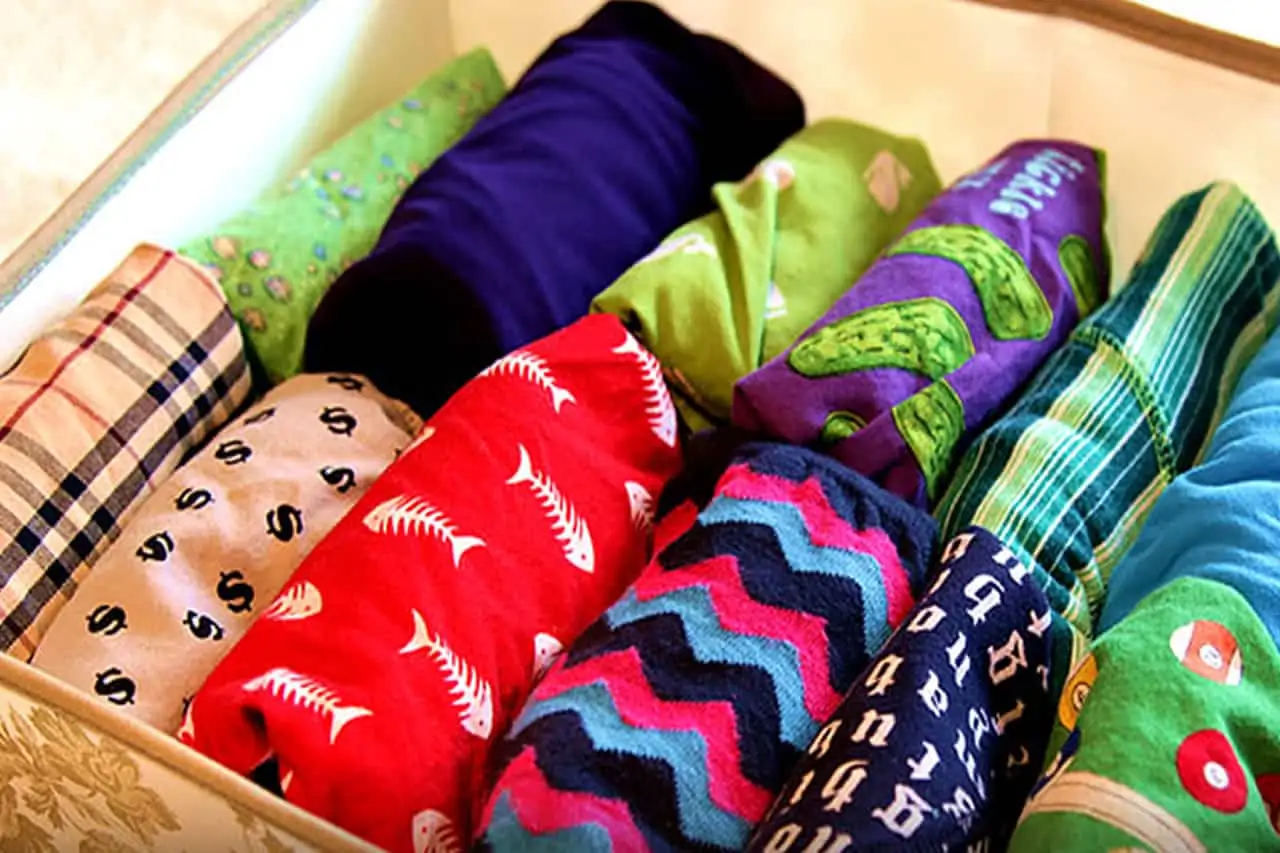
The Ranger Roll
This is not a new sushi roll, this is a way to fold clothing! It has its roots in military service, and has been known to keep clothes neat and compact.
To ranger roll at top, here’s what you can do:
- Lay your garment flat
- Creating a ‘lip’ at the bottom of the garment by folding the bottom of the garment up back over itself about 4 inches
- Smooth the garment and prepare for folding
- Bring one side in as usual, flip the arm back over itself
- Repeat step 4 on the opposite side
- Roll tightly from the top down, until the garment has been rolled up entirely
- Pick up the roll and flip the folded lip over the roll, containing the roll and sides in the lip.
- Your garment is a nice little rolled up package now!
In my opinion, the pros of this method are that it looks neat, saves space and is great for packing. That being said, some cons are that I think it takes more time, you can’t see exactly what you’ve rolled up (not great for items which are the same colour) and I anticipate that it can stretch out some garments unnecessarily. So you be the judge, to roll or not to roll, the choice is yours!
Pants, Legging & Jeans
If you can’t hang pants up (or if you aren’t fancy enough to fold your sweatpants – pinkies up), here how you can fold your pants to look neat and tidy. Master this fold and you’ll be able to get a job at a retail store any time!
To fold pants:
- Lay pants flat, facing up, smooth out
- Fold in half, revealing back pocket (or backside) facing you
- Fold crotch point over onto the leg to create a straight line with the leg seam (you may need to hold it in place until step 4)
- Fold bottom of pants up to just below belt loops (or imaginary ones), covering the crotch point
- Fold in half again, bringing the midpoint up to where the pant bottoms sit
- Flip over to reveal the pocket or backside.
Your pants should look like a perfect rectangle with the pocket facing you (again, if your pants have back pockets). Otherwise, you’ll just have beautifully folded pants with the neat edge facing you, which is perfect for stacking. You can also ‘file’ these by standing them upright. Whatever makes you happy!
Hanging pants with the “M” fold
I am calling it the ‘M’ fold because not only does it look like an ‘M’, but my name starts with this beautiful letter so I felt it only made sense. I love this because it solves a few hanger-issues: pants sliding to one side of the hanger, getting all bunchy and pants falling off the hanger for hanging unevenly. This neat method helps even out the pants across the width of the entire hanger and also helps to perfectly weight balance them so that they’ll no longer slide around. Also, I think it keeps them very wrinkle-free.
If you have space to hang your jeans or pants, try the M fold:
- Lay pants open and flat running lengthwise in front of you
- Take the hanger and feed the left pant leg over the hanger bar (toward your right) up until just above the mid-thigh point
- Now hold up the hanger and repeat step 3 with the right pant leg feeding it toward the left.
- Your hanger should have your pants dangling fairly evenly, you can adjust the pant legs until everything sits nice and even (hint: until it shapes the letter ‘M’)
Now you’ll notice your pants no longer move around and slide, they stay in place and won’t fall off.
Stockings & Tights
I think these are one of the most complex garments to have to fold. I’m used to balling them up and digging like a madwoman on those bold days I decide to wear them. So if you want to know how to make them dreamy, here’s what you can do:
- Holding the stockings from the waistband, flip the top of the stockings down about 4 inches to create a lip
- Lay flat on a surface
- Fold stockings in half; bring the toes up to the area just under the folded waistband
- Roll the stockings from the bottom fold up to the waistband (don’t roll over that lip)
- Lift up the bundle and flip the lip of stocking waistband over the roll to create stocking ‘ranger roll’!
You’ve achieved folding Nirvana. You’re welcome!
Sweater & Bulky Tops
This works well for large sweaters, knits, cardigans and anything else in shirt format which you don’t want hogging space in your closet:
- Lay garment flat, face down
- Fold one arm in straight across th back
- Fold the other arm straight across the back, opposite direction (now you should have a perfect rectangle)
- Fold each side of the garment in half-way to meet in the middle.
- Fold the base up one third, and repeat to create an even square or rectangle.
- Flip over and neck tag should be revealed.
This looks clothing-store neat and can either be stacked or filed!
Boxer Shorts (or Boxer Briefs)
If you have boxers, here’s a better way to fold them:
- Hold boxers up, ‘bum’ facing you (hold east and west corners of the waistband)
- Switch the orientation of your boxers so you are now holding them in profile (just grab north and south points of the waistband), so a ‘thigh’ should be facing you
- Lay flat in this formation
- Fold bottom end (leg opening) up into thirds toward the waist, you should have a long rectangle now
- Flip the package over to reveal waistband side (you do this to conceal the waistband during storage)
- Fold into thirds again, and this bundle created will allow you to stack and layer boxers neatly.
Now you’ve been schooled in folding mastery. I’d love to see how these tips have helped you make over your bedroom!
For more laundry tips check out our article on the Best Laundry Products and don’t forget to check out our eBook Bundle which includes the eBooks, my 3 Wave Cleaning System, 50 DIY Recipes, and The Complete Guide to Essential oils, plus a cleaning checklist! It’s great value and it will help you take your cleaning to the next level!
Looking for a BETTER & EASIER Way to Clean Your Home?
Cleaning Expert Melissa Maker is here to help with her game-changing 3 Wave Cleaning System that will help you clean your house faster and easier than you ever thought possible!


The steps to fold military pants are: Lay the pants out and smooth any creases and wrinkles; Turn the waistband inside out and flatten the pockets; Flip the pants and flatten the pants again; Fold one pant leg over the other to form a rectangular shape; Fold the ankles up and smooth out any creases and wrinkles; Roll the pants upwards, starting from the bottom; Wrap the rolled pants into a mini burrito.
Worth article! I just want to say thank you for sharing.
Does M fold work for dress pants
Love your videos!! What’s the best way to fold bulky, hooded sweatshirts and those extra-long sweaters (the ones that are as long as coats) in order to pack them away for summer storage?
I love this video! It was just what i was looking for and Thank you Elizabeth because I have the same problem. We have a bunch of jackets for the seasons and they are just crowding my closets. I have been thinking of doing a bin technique where I rotate out clothes based on the seasons but if you find a better solution please let me know!
Love you video’s, keep them coming
I need declutter ing so badly..any help out there.. Tips welcome x
I skeptically, clicked clean my space which led to your videos. I am a organizer and cleaner enthusiast but i dont tell people because generally dont share this hobby and if people dont understand they think its weird….well, i guess i am still in the closet;) pun intended;)But i am going to pass your website info to the masses. I have been folding laundry the same way for over twenty years. An Army wife showed me wgen i first got married and until now, had mo reason to change. I perfected the fitted sheet, thanks to you, and wanted to ad an alternative to people with less enthusiasm for the mundane jobs;) After you are done folding your sheets and pillow cases(omitting one) you put the whole kit and kaboodle in the pillow case.This way you have all your bedding together in a nice neat package and easily can be grabbed like a knapsack when going to make your bed. 😉 Keep up the interesting posts Melissa!
I actually know how to do it, but im sure other want to know how to fold a fitted sheet (tuck the corners into each other until you get a square). Love you melissa xxxxxx
I like your videos. I just finished watching the folding video. My question for you is, how to fold fitted sheets?
this! lol
I just found your website. As a clean freak … I love it!!!
For the M fold, step 3 is to repeat step 3. Typo?